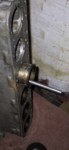
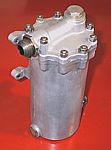
 The
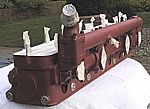
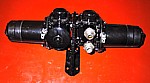
Forgotten Engine - click the icon to find out more !
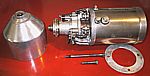
The
Forgotten Engine - click the icon to find out more !
The
Forgotten Engine - click the icon to find out more !
The diary is set out in tabular format with each day's work briefly described. If you place the cursor over the thumbnail pictures in the right hand column a message will appear stating how many pictures are available and at what size - eg "2 x images - 34&58kb". If you choose to click to the new page a narrative alongside the pictures will explain points of interest, particular problems or methods of rectification.
Click "Back to the diary" to return to this page
Click "Next page" to advance without returning to the menu
or Return to the strip down diary
or Go to the re-assembly diary
Click on the thumbnail images for full pictures
| Preparations | |||
| Date | Job | Hours | Click for pictures |
| 7th February | Removed the remaining 11 liners from the new block. | 1.5 |
|
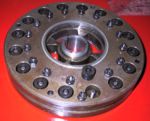
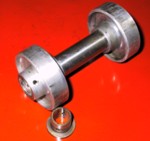
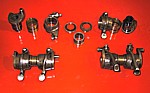
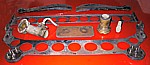
| 8th February | Eventually finished cleaning the sludge trap caps from S18K crankshaft. Cleaned the crank weights. Dismantled the crank damper - surfaces will need skimming. The damper unit does not resemble any of the drawings in TSD2066. | 3.5 |
 |
| 9th February | Cleaned and inspected damper. Temporarily re-assembled as it will be needed when the crank is balanced after its re-grind. | 3.5 |
 |
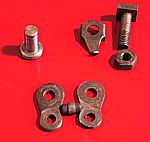
| 11th February | Cleaned the exterior of 'new' crankshaft, the number of which
is now revealed as T18J. Could not extract the sludge trap caps - they appear to
have been glued into place. There is little point in labouring on with cleaning this
item unless I decide that S18K crankshaft can not be used. Cleaned the clutch assembly ready for transfer to the machining company. Cleaned the cross shaft 'B' spacer. Cleaned number 4 cam follower block and re-assembled (4 hours!) |
5 |
 |
| 13th February | Packed all of small parts in boxes. Loaded block, 2 x crankshafts, clutch, new pistons & liners and boxed parts into the van. | - | |
| 14th February | Delivered all parts to Fiennes Restorations. Decisions
on which crankshaft to use will be made following crack testing. The best crankshaft
will be checked for straightness, ground and balanced. New metal will be applied to
main and big end shells and to the outside of the big end bearing blocks for the blade
rods. New little ends will be inserted - the end float on the crankshaft, and therefore
the shell machining, is determined by the con rod position. The axial position for
line boring the main bearings is governed by reference to the front and rear oil scroll
apertures. By happy coincidence I collected a new cylinder head for my 20/25 (GGA27) to replace the cracked original. |
- |
 |
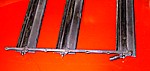
| 21st February | Stripped and cleaned #4 cam follower block and started #3. | 2.5 | |
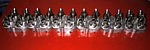
| 22nd February | Cleaning cam block assemblies again - finished #3,#5,#6 and started #1. The rear two (5&6) were incredibly dirty - to the point where the followers could not move freely due to the sludge build-up. | 5.5 | |
| 23rd February | Getting very bored! Finished off #1 and #2. Most satisfying after 11.5 hours of graft. | 3.5 |
 |
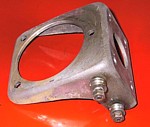
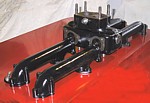
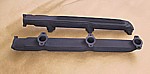
| 25th February | Cleaned the two cam box covers, idler gear and its support block (see text for a WARNING), and the dynamo drive assembly | 6 |
 |
| Time taken so far in preparations | 31 | ||
| Time taken so far... | 188 |
| More cleaning | |||
| Date | Job | Hours | Click for pictures |
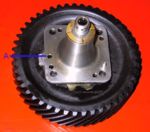
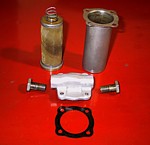
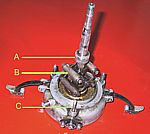
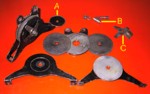
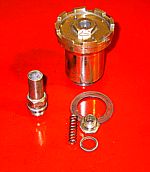
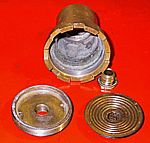
| 26th February | Stripped and cleaned oil pump. Cleaned and inspected camshaft | 3 |
|
| 7th March | Started work on the cylinder heads. Measured core plug dimensions and made tool blanks for extracting same. See table for information. | 4.5 | 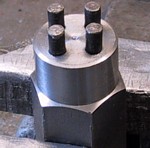 |
| 8th March | Inserted pins in the first two tools and attempted core plug removal. Removed valves from 'B' head and undertook some investigations. | 5.5 |
 |
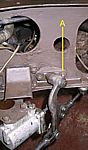
| 11th March | Started to clean the 'B' head but found the carbon deposits impossibly stubborn. | 3 | |
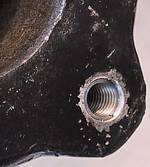
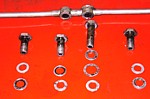
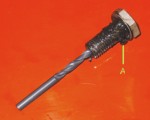
| 12th March | 'A' head - removed the manifold studs and rocker pedestal studs - #6 snapped off! Started drilling out broken stud. | 3 | |
| 13th March | Finished drilling out the broken pedestal stud; plugged the hole with aluminium, re-drilled and applied a helical thread insert. Drilled out the #2, centre row head stud that was cut off when removing the head. | 3 | |
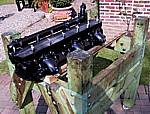
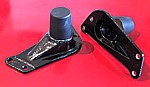
| 14th March | Old engine - replaced the main bearings (minus crank), sump and timing cover. Stripped-off all exterior fixings and the front engine mounting feet. Moved the block into store. Took heads to be dipped. | 2 | |
| 15th March | Cleaned the front engine mounting feet. Started cleaning the sump pan. | 5 |
 |
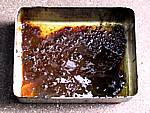
| 16th March | Finished cleaning the sump. Some interesting differences between the 'old' sump and the 'new'. | 2 |
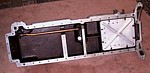 |
| 18th March | Dismantled, cleaned and re-assembled the sump oil filter. Re-assembled the sump pan. Started cleaning the two sections of the clutch housing. Dismantled the clutch actuating cross shaft. | 4.5 |
 |
| 19th March | Collected heads from stripping. Cleaned cross shaft and re-assembled it in the casting. | 2 |
 |
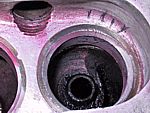
| 21st March | Both heads - cleared out debris from stud holes and oil ways. Repaired damage to #2 centre stud hole in 'A' head. Checked gaskets for leaks. | 4 |
 |
| 22nd March | Dressed the repair in 'A' head stud hole. Started final de-greasing of heads. | 1.5 | |
| 23rd March | Finished cleaning both heads. Masked-off heads and hand
painted 'B' head with aluminium primer. Found corrosion in 'A' head outlet pipe - effected
a temporary repair until a replacement can be acquired. I SUGGEST THAT ALL PIII OWNERS CHECK THESE CASTINGS. |
6 |
 |
| 24th March | Made new gasket for outlet pipe and refitted. Primered 'A' head. | 2 |
 |
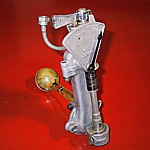
| 25th March | Dismantled clutch housing end plate and cleaned. Nb - locking ring is left hand thread. Removed bearing from clutch release assembly. New bearings required. | 1.5 |
 |
| 26th March | Stripped and cleaned the clutch release bearing assembly. | 0.5 |
 |
| 27th March | Heads - masked-off all core plugs and sprayed both heads with first few coats of gloss black. De-coked A1 to A6 valves and cleaned springs, etc.. | 5 |
 |
| 28th March | Removed the 'B' head outlet pipe to check for corrosion. Found similar problems to the other side. Repaired in similar fashion and left resin to cure. De-coked the remaining 18 valves. | 6 | |
| 29th March | Made gasket and re-fitted outlet pipe. Fitted new bearings to, and re-assembled, clutch release and clutch housing end plate. | 1 | |
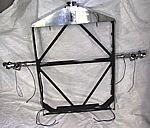
| 30th March | Built temporary face-plate. Both heads - smoothed off mating faces to remove slight irregularities. | 3 |
 |
| Easter | Gardening leave | - | |
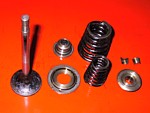
| 6th April | Drilled out exhaust manifold bolt holes and fitted helical inserts. Started grinding the valves into their seats. | 3 |
 |
| 11th April | A day of grinding valves. 'B' head #s 3 to 12, 'A' head #s 1 to 12. | 5 |
 |
| 12th April | Inspected cleaned-up valve seats using a lamp and magnifying
glass. 'A' head valve seats #s 10&11 showed signs of cracking. Undertook
die penetrant tests on all seats to ensure no further problems. Tried grinding out
the cracks but failed. Removed inlet manifold water pipe nuts but could not budge
either component; left soaking in freeing agent. Wasted about 4 hours tracing parts, information and engineering companies willing to undertake the work. |
3 |
 |
| 13th April | Tried to remove 'A' inlet manifold water jacket but still solid on its studs. Whilst ruminating on the cracked valve problem I discovered that whoever last re-assembled the heads had ground all of the valves into the wrong position. This was evident as I had assembled the valves in a numbered rack - now cleaned, one can see feint position numbers etched onto the stems. All very depressing! | 1 | |
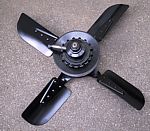
| 15th April | Replaced 'A' head water jacket nuts as the castings would not
budge. This may cause a problem when removing the seats - watch this space. Tested the cooling fan - rotated smoothly and quietly. Decided to dismantle anyway - front bearing seized, rear bearing worn out and virtually no grease in sight. |
1.5 |
 |
| 16th April | De-greased fan assembly, stripped off paint and applied two coats of primer. | 3.5 | |
| 17th April | Fan - rubbed down and applied several coats of gloss black to exterior parts. Greased and inserted new bearings. | 2 | |
| 18th April | Delivered 'A' head to Ristes in Nottingham to have the two
exhaust seats milled out and replaced. (Time not counted.) Rebuilt fan |
1 |
 |
| 20th April | Primed and painted the 16 nuts and bolts on the re-assembled
fan. Stripped the paint off the inlet manifolds and carburettor plinth. Applied aluminium primer to the four manifold pipes. The carb plinth is cast iron. |
6 | |
| 21st April | Masked up manifold pipes and plinth and applied several coats of primer. | 1 |
 |
| 22nd April | Further work on the inlet manifolds - rubbing down, more priming and final top coats. They now need to be left to cure for a few days. Engine front mounting feet primed and painted in gloss black. | 5 | |
| 25th April | Removed masking from the inlet manifolds. Ran a tap
down all of the mounting holes in the plinth to clear out debris. The two bolts on
the underside that hold the flange for the main water pipe were metric! Drilled out
the holes and put in helical inserts to bring back to 0.25" BSF. Started cleaning the oil and water supply pipes. |
4 |
 |
| 27th April to 4th May | On holiday - but no boring holiday pictures. | ||
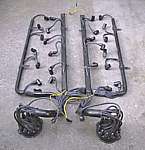
| 7th May | Cleaned the 'A' side rocker oil supply pipe and banjo bolts. | 2 |
 |
| 10th May | Cleaned the 'B' side rocker oil supply pipe and banjo bolts. Cleaned the crankshaft main bearing oil supply pipe. | 4 |
 |
| 13th May | Cleaned the tappet oil filter, pushrods, camshaft bushes and sundry nuts & bolts. Ground off the nipples from the pushrod ball-ends. | 5.5 |
 |
| 14th May | Cleaned the 'A' side front rocker assembly. | 5 |
 |
| 21st May | Cleaned the 'A' side rear rocker assembly. | 4.5 | |
| 22nd May | Cleaned the 'B' side rear rocker assembly plus a second hand rocker shaft for 'A' front. | 5.5 | |
| 23rd May | Cleaned the 'B' side front rocker assembly. | 5 |
 |
| 24th May | Rocker bushes - uncovered and re-opened the minute centre drillings. Ground off the nipples from the tappet adjusting screw ball-ends. | 3.5 |
 |
| 25th May | Cleaned the air filter canister and polished the exterior. Cleaned the carburettor exterior (the internals were services earlier in the year - see maintenance procedures). Cleaned fuel supply pipes and the bottom water tube. Stripped and cleaned the fuel delivery strainer and the crankcase breather. | 3.5 |
 |
| 27th May | Stripped and cleaned the sump oil gauge and the oil pressure relief valve. Cleaned the oil filler pipe and the 2 pipes for the oil filter. | 5.5 |
 |
| 28th May | Went to Nottingham to collect the 'A' cylinder head with new valve seats in #10 & #11. Unfortunately, the heating process required to fit the seats removed half of the new paint work. (Why not all of it to save me the trouble?) | - |
 |
| 29th May | Cleaned the main oil strainer and its relief valve. I had already converted to a paper element filter unit. Checked the dynamo brushes and cleaned inside and out. | 5.5 |
 |
| 30th May | Cleaned the starter motor commutator, checked the brushes and polished the outside. Cleaned the dynamo coupling to the water pump. Painted the front exhaust bracket. Re-ground the #'s 10 & 11 'A' head exhaust valves into their new seats (about 1 hour each!). | 5.5 |
 |
| 31st May | Stripped the paint from 'A' head, prepared, masked, primed and painted | 3.5 | |
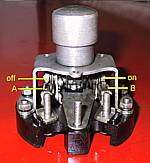
| 1st June | Stripped the HT leads from distributor caps and tubes. | 1 |
 |
| 3rd June | Re-assembled exhaust bracket. Made one new bracket for the HT tubes and re-soldered all brackets into their correct positions. Cleaned and primed all 8 HT tubes. | 4 | |
| 4th June | Stripped off the paint from the 4 smaller HT tubes due to a paint reaction. Re-primed then painted all tubes. Cleaned the oil pump drive shaft. Dismantled the 'A' distributor and cleaned it. New oil seal required for the drive shaft. | 9.5 |
 |
| 5thJune | Removed oil seal and replaced with new one. Removed bob weights and dismantled drive shaft and base plate. Fitted new bearing and started rebuilding. | 4 |
 |
| 11th June | Replaced the cam oiler felt. Re-assembled 'A' distributor with new points but existing capacitor. Dismantled 'B' distributor and cleaned it. Ground out oil seal. Replaced bearing with some difficulty. | 8 | |
| 12th June | Finished assembling 'B' distributor including the
installation of one new insulator on a terminal post. Removed nuts from water pump casing and left joint to soak in penetrating oil as it had been assembled with instant gasket!!! |
3.5 | |
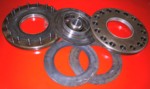
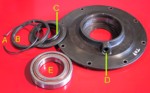
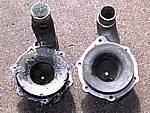
| 18th June | Inspected water pump. Both casings are severely damaged and have been repaired before. Could not separate without destroying. | 1 |
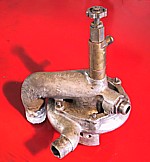 |
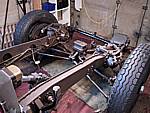
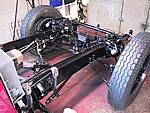
| 19th June | Started to de-grease front end of the chassis. | 3.5 |
 |
| 25th June | Finished cleaning front of chassis and front suspension. Painted both chassis rails in primer. | 6.5 | |
| 26th June | Finished painting chassis and front suspension in primer. | 3
|
 |
| 27th June | Gloss painted front suspension, steering and front cross member. | 5.5 | |
| 28th June | Gloss painted front chassis rails. | 3 |
 |
| 29th June | Prepared cylinder heads and applied final top coat of paint in Hammerite smooth black. | 3.5 |
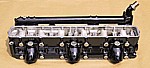 |
| 1st to 3rd July | Who said old cars were a problem? Nothing compared to a computer system crash. | - | |
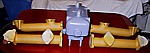
| 3rd July | Received the repaired bottom bump stop plates. Painted both and left to dry. Removed all of the masking tape from the cylinder heads. | 1 |
 |
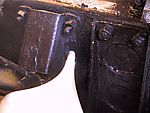
| 6th July | General maintenance on the chassis whilst accessible. Installed bottom bump stop plates. Found and rectified a leak in the off side front jack. Replaced a missing nut on the mounting plate for the brake actuating lever - that could have turned life into a disaster. | 4 |
 |
| 8th July | Measured HT leads (see table). Refitted valves to cylinder heads. Removed fuel pump from bulkhead. | 3 | Table |
| 9th July | Dismantled and checked fuel pump. Cleaned and painted pump. | 3 |
 |
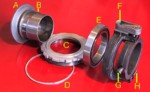
| 11th July | Have obtained very good second hand water pump castings!!! Inspected these and dismantled the old pump to see what can be salvaged. | 1 |
 |
| 13th July | Removed clips and brackets from bulkhead. Cleaned the bulkhead. Tidied wiring. Replaced the petrol pump. | 3 | |
| 14th July | Painted the bulkhead brackets and spare wheel mounting plates. Cleaned the clutch output shaft. Stripped, cleaned and re-assembled the engine friction dampers. | 4.5 |
 |
| 15th July | Removed the wiper motor. Painted the oil reservoirs for the jack and one-shot system. Replaced bulkhead brackets. | 2 | |
| 16th July | Removed the wiper motor bracket. Painted the wiper motor and its bracket. Cleaned and fitted the union and heater control to the new water pump case. Made gasket for water pump castings. Drained and flushed the front shock absorber housings. | 5.5 |
 |
| 17th July | Dismantled the radiator shell. | 2.5 |
 |
| 19th July | Back flushed the radiator core. Straightened out all bent vanes and re-blacked where necessary. De-greased the shell frame. | 1.5 | |
| 20th July | Removed the shutters that are split pinned into the upper brackets. Cleaned the backs of all shutters plus the other fixings. | 2 |
 |
| 21st July | Painted the centre shutter actuating arms. Prepared, primed and painted radiator inner shell frame and accessories. | 3 | |
| 22nd July | Final paint coat on the radiator shell frame and accessories. | 3 | |
| 26th July | I have spent about 40 hours over the last week
trying to find the reference number and a supplier for appropriate big end
shell bearings. Technical Department at Vandervell did a sterling job
in locating both their original drawing (L1901) and the reference number of
a current bearing that can be used as an alternative. The table shows
my findings for possible substitutes for the original Halls Metal shells. Off for a vacation - see you anon. |
- | Shell table |
| 2nd August | Bearings received by the engineering company. Crankshaft and connecting rods scheduled for machining next week! Is it too early to be optimistic? | - | |
| 14th August | Back from holiday - two weeks spent acting as a
mobile canteen for the Cumbrian midges. Radiator steam valve dismantled and cleaned. Re-assembled the radiator inner and outer shells, re-threaded the webbing and fitted new 4BA nuts and screws. |
6 |
 |
| 16th August | Installed new wiring into the radiator shell. Cleaned the remaining studs, springs etc. Ran taps and dies over all threads. | 2 |
 |
| 17thAugust | Removed studs from radiator bottom tank to enable the installation of the matrix into the shell. Replaced all fixings plus the drain tap. Installed all shutters. It is important to ensure that the outer shutters are in the correct position as they have usually been 'eased' to avoid fouling the shell. Adjusted the shutter actuating arms so that the whole system operated correctly. | 6.5 | |
| 18th August | Cleaned and attached the dog-bone links to the shutter actuating levers. | 1 |
 |
| 19th August | Removed the radiator steam valve lid and extracted the diaphragm. Soldered-up the lid vent holes. | 1.5 |
 |
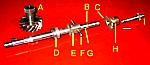
| 21st August | A slight digression into dip switches... ...and yet more bad news. |
4.5 |
 |
| 22nd August | Having re-routed the flexible conduit in the engine bay to its correct courses it was necessary to extend the electrical wiring by a few inches to reach the radiator junction boxes. | 1.5 | |
| 29th August | Cleaned the insides of the rocker covers. Rubbed down the exteriors and applied first coats of enamel paint. | 4.5 |
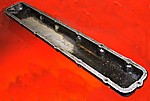 |
| 30th August | Left the rocker covers to cure on the Aga. Busied myself cleaning and repairing the carburettor overflow pipes and the oil pressure gauge feed pipe. | 4 | |
| 3rd September | Prepared the rocker covers for the final coats of paint. | 3 | |
| 4th September | Applied four coats of paint to the rocker covers. In between coats I drilled out the oil feed holes in the tappet oil filter banjo bolts to the original pattern. Cleaned off the exhaust manifolds and sprayed with high temperature paint. | 5 |
 |
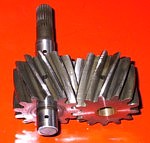
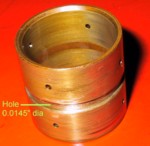
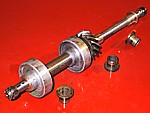
| 6th September | Started machining the distributor cross-shaft to remove wear from the areas abraded by the three bushes. | 1 | |
| 7th September | Finished machining cross shaft. Made three new cross-shaft bushes. | 5 |
 |
| Time taken so far on this section | 303 | ||
| Time taken so far... | 491 |
| Return to home page |